Showing posts with label Battle report. Show all posts

Sunday, 20 June 2021

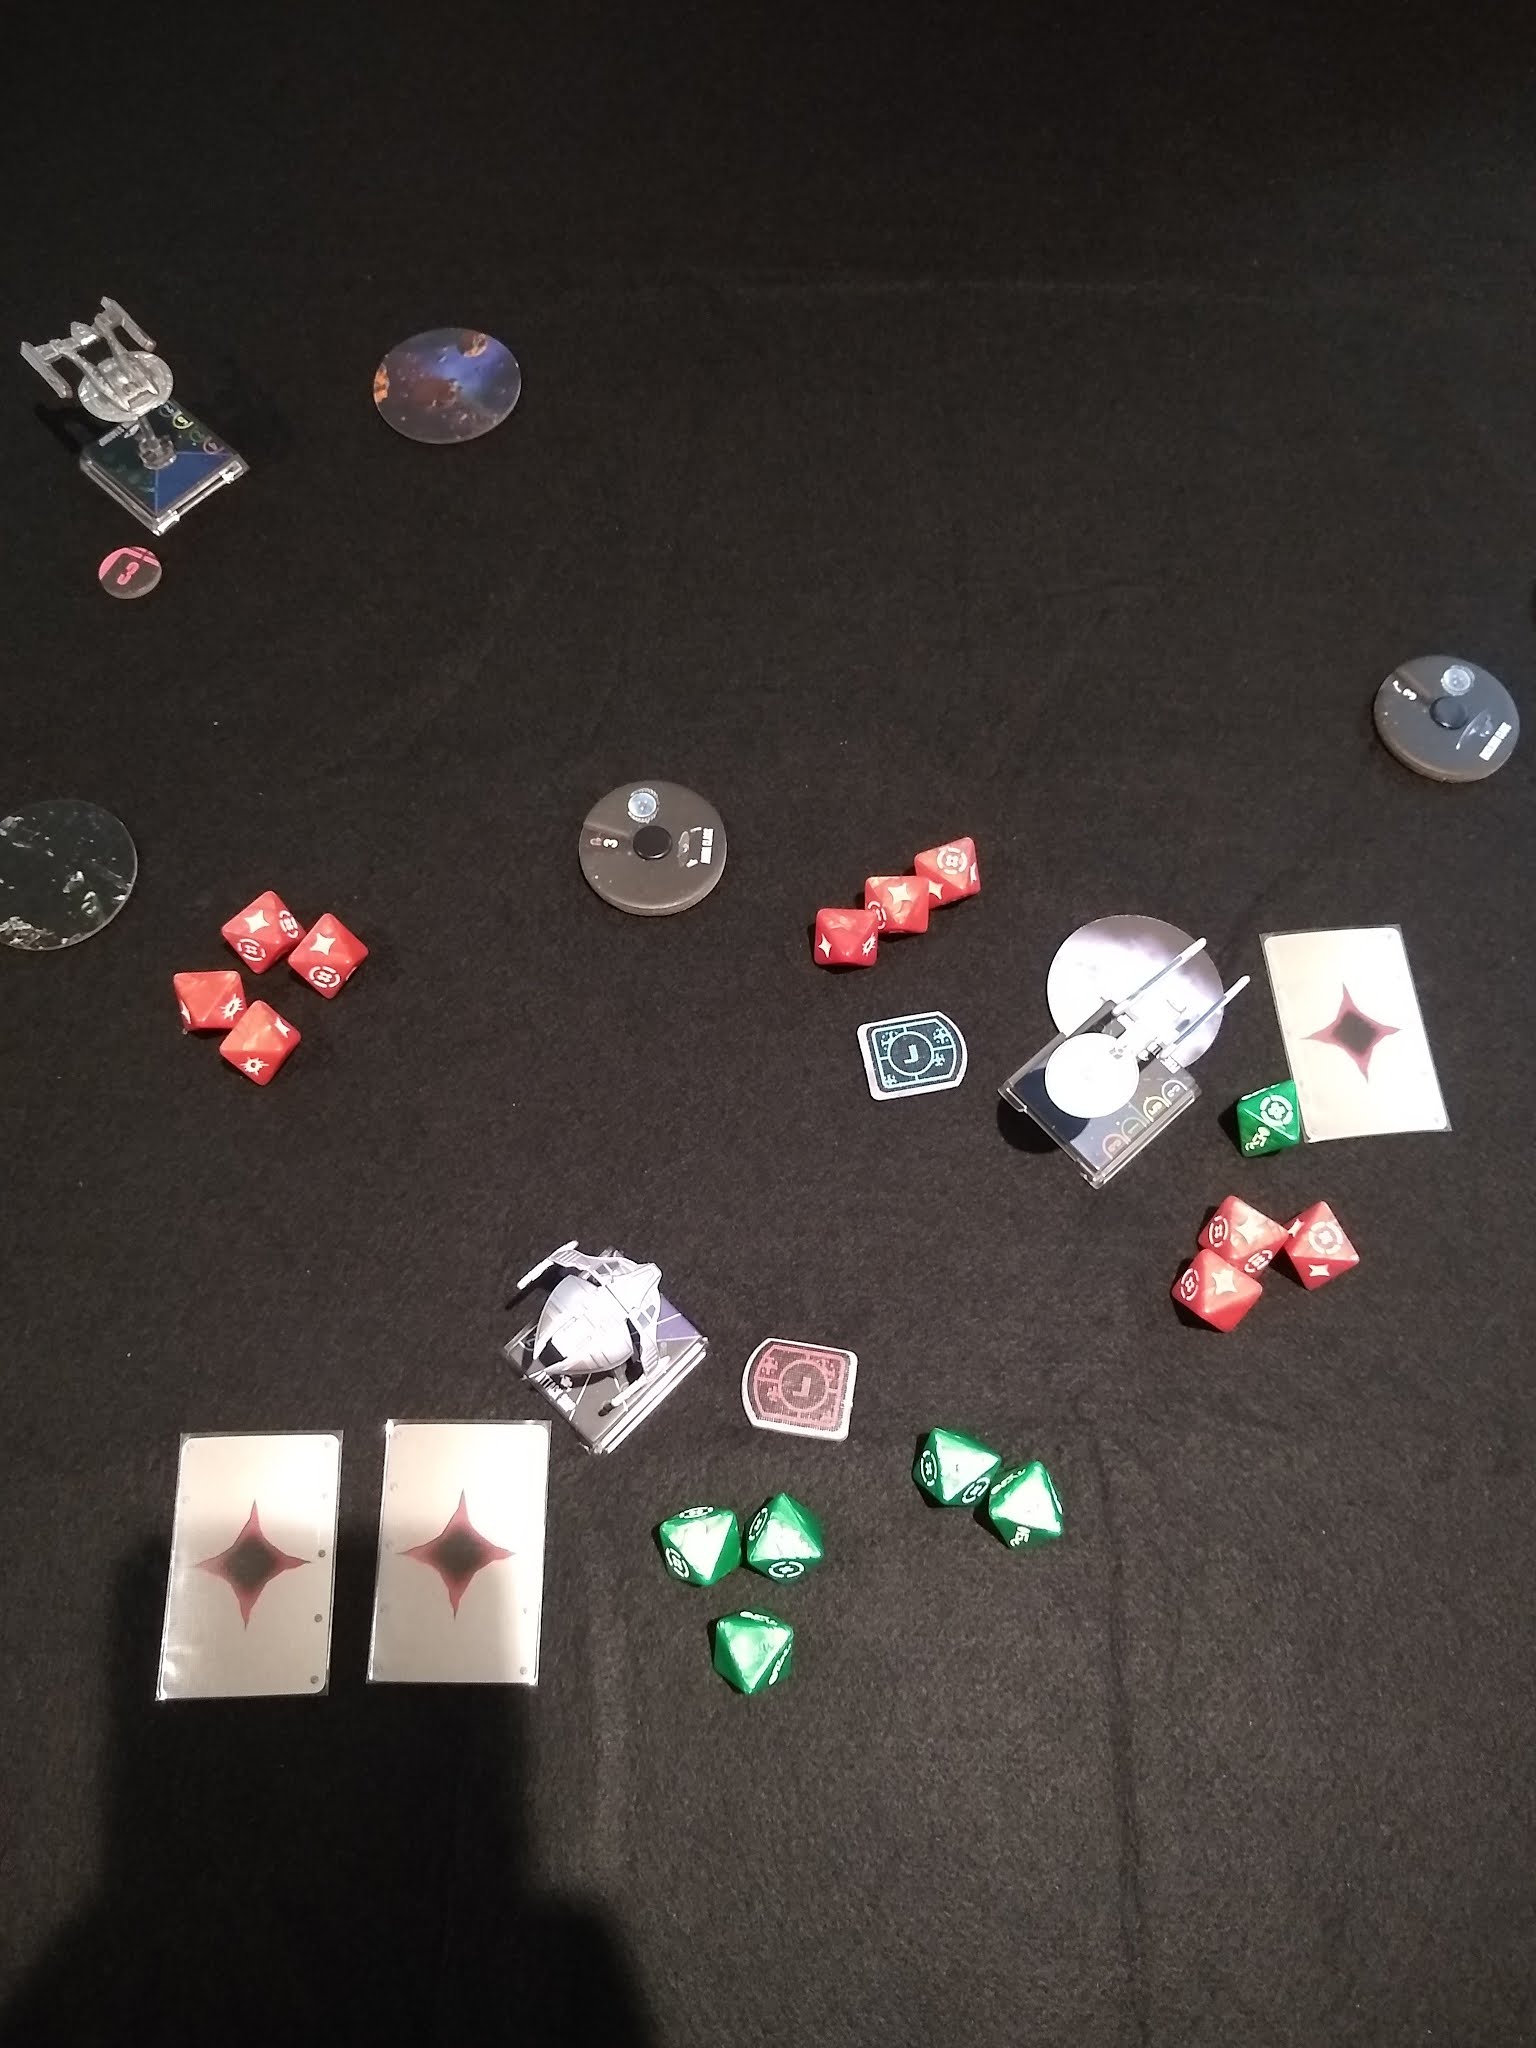
Star Trek Attack Wing Battle Report: Testing the AI

Having got into Star Trek Attack Wing last year, I excitedly bought the co-op conversion Star Trek Alliance when it came out recently. Before playing the campaign properly, I thought I'd try out the AI to get a handle on how it works.

For those who don't know, the AI ships choose their manoeuvres based on where your nearest ship is and a dice roll, meaning that you can never predict exactly where they'll go. They also break the rules a little, given they're not aware of obstacles like a human is and so can manoeuvre a little around them if they're about to crash.

Preparation

To start with I decided to play the first mission (in terms of deployment and enemy ships) without the normal objectives, which means two enemy ships start on the table, an elite one arrives on round 3, and then a final one on round 6.

This was my build, giving the Excelsior torpedoes as it has a rear arc, and dorsal phasers to the Akira as it has such a limited firing arc.

The battle

Round 1 and we all move straight ahead.

Round 2 and I head left to focus on one enemy, whilst the rightmost AI makes an odd choice by continuing to fly forwards. I was in its front arc so it was limited to straights, but it's not a move I'd make as a human.
Focus firing from my ships does exactly enough damage to take out the enemy before it can fire.
Round 3 and the elite comes on, with a 360º firing arc.
The elite randomly came on from the top left, right where I needed it to be, whilst the normal enemy banked rather than turned and so was still out of the fight.
After a lot of shots, the elite had lost all of its shields and one of its three hull. But my Excelsior had taken shield damage as well.
Round 4 and the elite manages to get in right behind the Excelsior, but that is still in its torpedo arc. The normal enemy finally lines up a shot!
The elite does further damage to the Excelsior's shields, but is destroyed by a volley of torpedoes in return.
The Akira is now out of range to shoot (it's 360º weapon is limited to range 2) but manages to evade the incoming damage.
Round 5 and the enemy again fails to land a hit, but only takes two shield damage.
Round 6 and the final reinforcement arrives, whilst the incumbent enemy makes another odd choice.
One damage is done to the starting enemy, and the Akira takes some shield damage.
Round 7 and the reinforcement is destroyed, again with exactly the amount of damage needed, somehow leaving the cowardly enemy from the start as the only opponent left.
Round 8 and it finally grows a pair and decides to joust with the Excelsior, taking one hull damage apiece.
Round 9, and the Akira barrels in and ends things.

My thoughts

The AI works pretty well, all things considered. I followed the logic to move it to avoid obstacles once or twice, but given I also flew onto them during the game that means it's just as cavalier / stupid as a human!

The issue with it is that it can't plan as a whole, hence why in rounds 2 and 3 the rightmost ship failed to turn right hard enough to pin my ships in from both sides. But as a way to play single player or co-op games it works very well, and it'd be easy to up the difficulty by adding extra ships, increasing their spawn frequency, or even including more elite versions.

I also think it's fair to say that I rolled luckier than average, taking out two ships with exactly the damage needed. Plus the elite that spawned never got to use its ability, as it was too good at keeping my ships in its front arc.

Saturday, 6 June 2020

Warcry Battle Report 4: Sacrosanct Chamber vs. Jack's Pack

After losing not once but twice, my proud Sacrosanct Chamber warband had somehow made it to their first convergence. Let's see how they did.

The scenario

Let's look at the scenario and cards...
A very open battlefield
This is rather open, which means we'll both be able to make full use of shooting (with Jack, eek!). Note that the mission rules mean the objective has to be on the little platforms in the top left or bottom right.
Gleam for the Gleam God! Shine for the shine throne!
Rather than a twist like last time that is functionally pointless, this one is actually pointless.
Even before playing this I'd heard bad things about The Ritual. It is heavily RNG-dependent, as if you roll completely average over 4 battle rounds you will get a score of 14, which means all it takes is -2 from your opponent to lose you the game. Oof!

That said, I'd lucked out. The deployment is absolutely perfect for this mission. It meant I deployed around the objective, whilst my wife had to deploy pretty much as far away as possible and come towards my slow-moving beatsticks. I was quietly confident.
The objective is on the platform underneath Chanda, my female Castigator

The game

Round 1 began with me winning priority and paying for a Quad. I opened fire with Chanda who was stood on the objective, firing at Fee the Snotling in the hope of removing a body and a potential source of Wait actions. I wasn't rolling well, and only managed 6 damage.

Jack opened fire on my other Castigator who was in cover, using Rampage for three goes, but luckily didn't take him out (I think it was 8 damage in the end). In response that Castigator shot at and killed Terry the Termagant, and then put two wounds onto Bjork da Orc (using Rampage).

Over the next few activations my wife's models moved forward, whilst my three melee warriors made a line in front of the objective.

Maggie the Termagant proved herself, firing at my Castigator in cover and getting a crit and a miss. She has a Destiny Level, so re-rolled the miss and got another crit!
Dead-eye Maggie
The last action of the round was Ratatouille spotting a gap in my line that, upon checking, was EXACTLY the width of his base. So he scampered on through and got within 3" of the objective.
As a fan of sneaking, I applaud Ratatouille
That meant there was a -1 applied to the ritual die roll, and so the 5 became a 4.
I rolled a 5 for the ritual on round 1
Round 2 is when the lines fully connected, and I failed to do much damage. My Sequitor Rampaged  into Bjork da Orc and Szczepan, but failed to kill Szczepan even with three swings.
Not quite a wiff, but definitely not a success
Jack, on the other hand, absolutely nailed his shooting. Using the Triple to double his shots he rolled exactly the 20 in one attack action that he needed to kill my Castigator who was stood on the objective, before she'd had a chance to shoot.

Szczepan swung once and danced away, and my leader wiped out Ratatouille, leaving the board looking like this at the end of the round:
She's lost 2, I've lost 1
Rolling a 2 with no enemies near the objective, I now had 6 of the 13 points needed to win.
Only a 2 this time
Round 3 was a bloodbath. After my warriors had been a bit pillow-fisted in the previous two rounds, they now remembered that they're meant to be elite warriors. Yes I lost my other Castigator, but I took out four models with my three non-leader models (the female Evocator counting for two due to a Rampage).
Not much left by the end of round 3
The highlight, though, was Dollop the Snotling deciding his best play was to pin two of my models in place by running in between them.
Dollop the Brave
I forgot to take a photo of the roll this round, so here's an artist's impression of what it would have looked like:
I rolled a 3, so I'm at 9/13
The final round involved some more killing. My Evocator killed Dollop and then moved to pin Willard in place, who was then finished off by my Sequitor.

Jack failed to do anything so Fee, not wanting to be shown up by his brother Dollop, took a chance and ran in to try and hinder the ritual.
Fee the Also-Brave
With only two wounds left, my leader easily put an end to that!
How the board looked at the end of round 4
So with everyone dead on her team other than Jack, it was time to roll to see if I completed the ritual. I needed a 4+ and rolled a...
I scored 11 out of the 13 needed to win

My wife very graciously offered to count it as a win, because:
  1. It was completely random and didn't reflect how the game played
  2. Pity
  3. She found out we'd have to play the same mission again next time, and again and again and again until I eventually won
I think it was #3 that clinched it.

Aftermath

For me:
  • I gained 7 Glory
  • My Sequitor gained a Destiny Level
  • The female Castigator rolled a 66 for her injury, so gained a Destiny Level!
  • I then gave her a Jar of Chamonic Glowflies, so she could count abilities as one level higher for a game
  • Most importantly, my leader chose the only not-shit Greater Artefact from this quest:
He can literally throw the book at you
My wife was less lucky when it came to injuries:
  • She gained 4 Glory
  • Jadwiga got a temporary fractured arm
  • Willard Strawbelly got another gut wound, but this time it was permanent :¬(
  • Maggie lost her Destiny Level
  • Ratatouille also got a temporary fractured arm
  • Fee was rewarded for his bravery by dying, but was immediately rehired
  • Dollop is now permanently blind in one eye, alongside his permanently fractured arm x-D

Thoughts

My Stormcast finally won a game (sort of)!

We agreed that we'd both had a fun game, but that was in spite of the mission. Asymmetric missions that create uphill battles are one thing, but a mission where both players can sit around and pick their noses for four rounds and the result is entirely dependent on 4D6 is something else.

Looking ahead my final convergence is playing this same mission but as the attacker. I am really looking forward to that :¬/

Tuesday, 12 May 2020

Warcry Battle Report 3: Sacrosanct Chamber vs. Jack's Pack

Having played two games (here and here) my wife's warband were now onto their first convergence. They're following the Kharadron Overlords quest, and so the mission was as below:
I brought my Sacrosanct Chamber SCE, who were hoping to redeem themselves after their first game.

The scenario

I won the priority roll for deployment and so got to choose who started where as well as the location of two of the three objectives in the mission. Basically the set-up was as follows:
  • There were two objectives which I placed in the top-right quarter, one to the east of the tower (on the floor, but we placed it on the roof so it was easier to measure from) and the other not far from the piece of rubble, and one that she placed towards the west
  • To win she had to claim at least two of the objectives at the end of round 4
  • I picked deployment so that two of her groups would start on the western edge
  • My Hammer (just one Evocator) would appear on the western edge, and her closest reinforcements would appear on the southern edge
  • The Twist card did nothing: it gave our leaders a bonus when fighting each other in melee, but that was never going to happen
Apt, but of no consequence

The game

I'm afraid I don't have a deployment shot, but here is how things were looking at the start of the second battle round:
Blood is spilled
My leader had made a beeline towards Jadwiga as her shooting is very scary, whilst my Castigator helped out. At the start of round 2 my Dagger reinforcements came in on the northern edge (the right in the picture above) to try to secure the middle objective, and hers came in from the western edge.
Jack and his reinforcements
By the end of round 2 I'd taken out Jadwiga and ran my leader out of sight of Jack, as he was already wounded. My reinforcements had moved forwards, with the Sequitor standing in the one possible position that meant he held both objectives. My reinforcement Castigator had run onto the platform to shoot at Jack, and using his Triple to boost his shooting did... zero damage! I was stupid and should have shot at Ratatouille as I'd have killed him, and getting into a firefight with Jack is a lost cause as he has more wounds and is a better shot. Which was proven when he returned fire and knocked 16(!) wounds off of my Castigator, leaving him with four :¬( Jack also used his consumable artefact to give them D3 extra wild dice next round.
Run away!
The start of round 3 saw our final set of reinforcements come on. I ummed and ahhed about where to place my Evocator. I had initially decided to deploy her in base contact with Ratatouille and Fee (in hindsight the correct decision), but instead got greedy and placed her so that she could take a run at Jack to try and hurt him and lock him down.

My wife's reinforcements came in on the southern edge, to threaten what had previously been the more secure of my two objectives. Apart from Willard, who hid in cover at the top of the statue head as he had only four wounds due to his cracked rib.
Everyone's arrived for the party
Key events this round:
  • My Evocator managed to get to Jack in combat and do some damage, but not enough to stop him shooting and killing my Castigator sitting on top of the objective
  • My remaining Castigator couldn't shoot at Maggie as my dumb leader was stood in front of her, so she instead fired at Bjork da Orc, doing damage but failing to kill him
  • My leader ran to get onto the objective in the ruins
  • Szczepan ran forward and hit under the bell tower
Such a brave grot
Round 4 is when things got very tactical. I was thinking that I might be able to win this, as I had some very resilient models that my wife couldn't kill, and a lot of her models were a long way away. But it would mean keeping her southern reinforcements away as well as those coming in from the left. And she still had more bodies than me...

This was by far the most tactical round we'd played out of the three games. There was almost no combat, with it being a mix of wait actions (so many wait actions!) and running around. I'd managed to kill her models on the southern flank with my remaining Castigator, securing that objective. But it meant I only had two models on the objective in the ruin, and no way to steal the one on the western side with both Terry and Ratatouille there.

My wife played very well, waiting out my activations with her larger number of models, and then rushing the objective when I had nothing else to activate. With the final activation of the game, Fee the Snotling ran forward and won the game for her, 2:1!
Fee and injured Willard run forward to secure the objective and win the game!
How the battlefield looked at the end of the game

Aftermath

My Castigator, the one model I lost this game? He died, so I had to spend Glory to hire a new one back. I then rolled for an artefact and got the one that heals injuries, which is useless for these guys (but my Grots would like it!) as no-one is injured. And after three games I'm still yet to gain a Destiny Level. Oh well!

For my wife Willard's cracked rib healed, Jadwiga died but was resurrected, and Dollop the Snotling now has a permanently fractured arm that means he is at -1 Strength (not that big a deal, TBH). Her random artefact was a Vial of Heartwood Sap, which is a consumable that means Jadwiga can heal a visible friendly model D6 wounds.

And most importantly: for winning her convergence my wife chose to give Jack an Aether-Gold Share. Once per game he can trigger this to give all friendlies within 6" +1 Attack. Ouch!

Thoughts

My wife is really good at this game!

This was a really close, fun game. I made some mistakes - trying to go for Jack when I'd have been better off trying to thin the herd - and my wife capitalised on that well. And of all the games to lose, the best ones are someone else's convergence.

The next time we play I think it's time for my Sacrosanct to try to win their convergence. Oh dear...

Saturday, 9 May 2020

Warcry Battle Report 2: Gloomspite Gitz vs. Jack's Pack

After yesterday's game, I was excited to try out my Goblins!

The scenario

We again rolled on the Tome of Champions mission table, and rolled up something that on the face of it looked very similar to last time. However, rather than trying to take each other's objectives, this time there was a fun mechanic where the objectives change their score each battle round.
This looks like lots of fun
We again skipped using the Twist cards, and randomly drew this battlefield:
I insisted we play one with the belltower, because it's cool
I had split my warband up as follows:
Dagger, Shield, and Hammer
My Shield with Boss Arfa ready to go, staring down Jack and Jadwiga
My Dagger, on the other side of my deployment
The terrifying opposition :¬o

The game

The first round was a mixed bag for me. Jack just deleted Ser Stabzalot the Squig Hopper, who is one of my two key models. But then in better news I got a Quad (I can't remember if it was native or by using a wild dice) and I used it on Boss Arfa. Even with our house rule reducing the power of the GG Quad it's still a better Rampage, and he promptly removed Ratatouille and Jadwiga in one activation! This gave me control of one of the primary (3-point) objectives this round.
That's how you take an objective
On the other side of the board there was nothing I could do about the other primary, other than take a cool photo of a Shoota lining up a shot
Round 1: 4:4
The primary and secondary objectives swapped over, so now there was a scramble for the new 3-pointers. I left the Netta cowering where he was and so Boss Arfa and the Hammer squad rushed forwards, but failed to take the contested objective.
Boss Arfa and Nasha managed to pin Jack against the wall
On the other side my Goblins didn't do much, other than keep the other primary objective safe.
Round 2: 8:8
This was an important round. Boss Arfa engaged Jack in an honourable duel, and managed to fell him in not-so-single combat. There was then a lot of jostling for position and some hits (including Szczepan using his AoE Quad to hurt my guys for 5 damage each!), but in the end I still wasn't able to steal this objective.
I love you Arfa!
On the other side Stikkit the Shoota "strategically withdrew", as he didn't fancy getting shot at any more given he only had two wounds left. Prog da Netta then ran over (I reckoned that objective was safe) and threw a net over Bjork da Orc, pinning him in place.
I imagine it's like catching a wasp under a glass: You don't want to be there when it gets out
Round 3: 12:12
In the final round Boss Arfa and Nasha finally managed to secure the objective they'd been fighting over, with Nasha blocking Maggie's path to be able to get to it...
Szczepan was glad there was no 5th round
...whilst on the other side another well-placed net kept the objective safe from a marauding orc.
R4: 19:13 to me!

Aftermath

It turns out Boss Arfa hadn't actually hurt Ratatouille, he'd just run off and gone on an adventure, gaining a destiny level in the process! My wife didn't get any artefacts, and had some bad luck with injuries: Willard Strawbelly the Guardsman got a temporary cracked rib, halving his wounds, and Terry got a temporary broken leg, reducing his movement.

Meanwhile, I got some Blight Serpent Venom, giving Ser Stabzalot +1 Strength, and Skwire the Stabba is now permanently blind in one eye (-1 Attacks)... which makes sense as his model has an eyepatch!

Thoughts

I. Love. Goblins. The two fast models (although Ser Stabzalot did nothing this game) and some helpful chaff make these guys lots of fun. Plus SQUIGS! Boss Arfa is also amazing. I took seven of her models out in this game, and Arfa accounted for five of those :¬o

My wife got even better at the game, as she was using wait actions like a boss :¬(